[프로젝트 생성하기]
https://honeystorage.tistory.com/252?category=784116
[개발환경 세팅하기]
https://honeystorage.tistory.com/253?category=784116
[절대경로, 스타일 모듈 및 에디터 설정]
https://honeystorage.tistory.com/254
[ 푸시알림 완벽구현 - 최종판 ]
https://honeystorage.tistory.com/306
푸시알림 보내기와 관련된 키워드는 크게 4가지이다
1. react-native-push-notification && @react-native-community/push-notification-ios
2. react-native-firebase/app && react-native-firebase/messaging
3. 푸시알림 관련 firebase 설정
4. 푸시알림 관련 apple developer 설정
솔직히 앱을 개발할때 처음에 한번만 하면 되지만
할게 많아 마치 진입장벽처럼 느껴진다.
심지어 자주 안하다보니 매번 할때마다 새로운느낌...
(1) react-native-push-notification
그리고 @react-native-community/push-notification-ios
관련 세팅
늘 그렇듯 필요한 모듈을 설치하고
환경설정을 먼저 해본다.
yarn add react-native-push-notification
yarn add @react-native-community/push-notification-ios
https://www.npmjs.com/package/react-native-push-notification
환경설정은 위에 가이드라인을 충실히 따르자
https://www.npmjs.com/package/@react-native-community/push-notification-ios
ios를 위해 추가적으로 설정을 해주자
(2) firebase를 설정
낯선용어라도 겁먹지말고 잘 따라가면
완성되어있을테니 가이드라인을 따라가보자
https://firebase.google.com/?hl=ko
위 링크로 접속해서 프로젝트를 생성해보자

그리고 위 버튼을 통해 ios와 android를 만든다.
다음, 안드로이드를 클릭
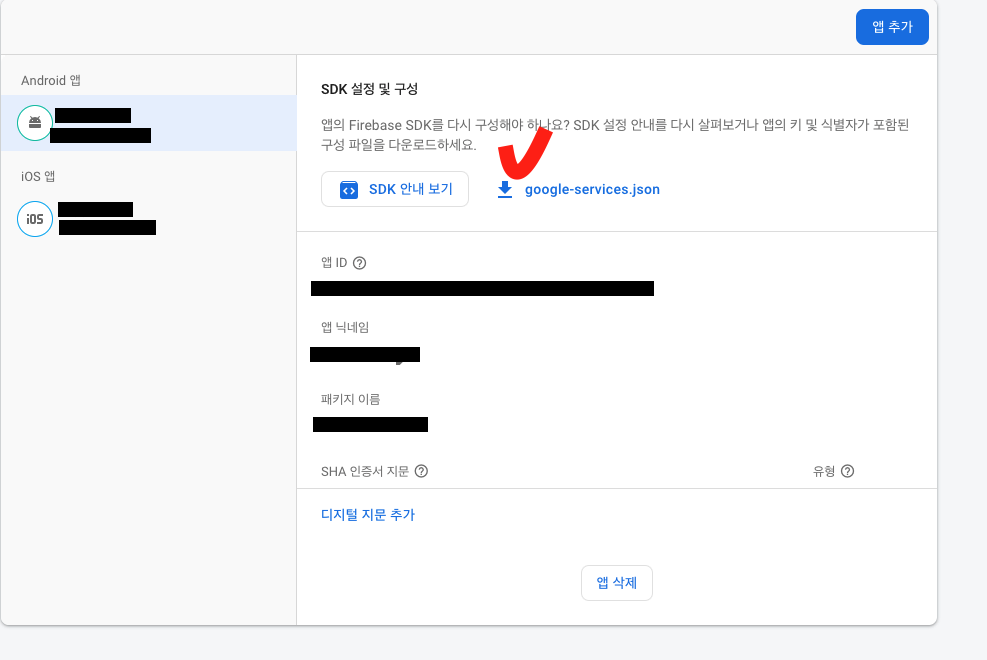
google-service.json을 다운로드해서
your-project/android/app/
경로에 위치시킨다.
ios에서도
GoogleService-Info.plist를
내려받아보자.
마찬가지로 적절한 위치에 배치할건데
xcode를 이용할것이다.
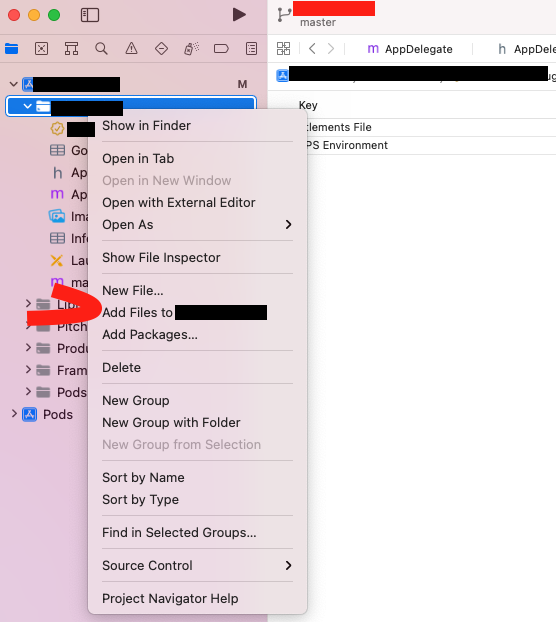
위 버튼에서 열리는 창에서
GoogleService-Info.plist를 add
아주 기본적인 설정은 여기까지이다.
지금부터는 돈이 들어간다. ios때문이다.
안드로이드만 운영할 사람은 이 파트는 생략해도좋다.
(3) apple developer 설정
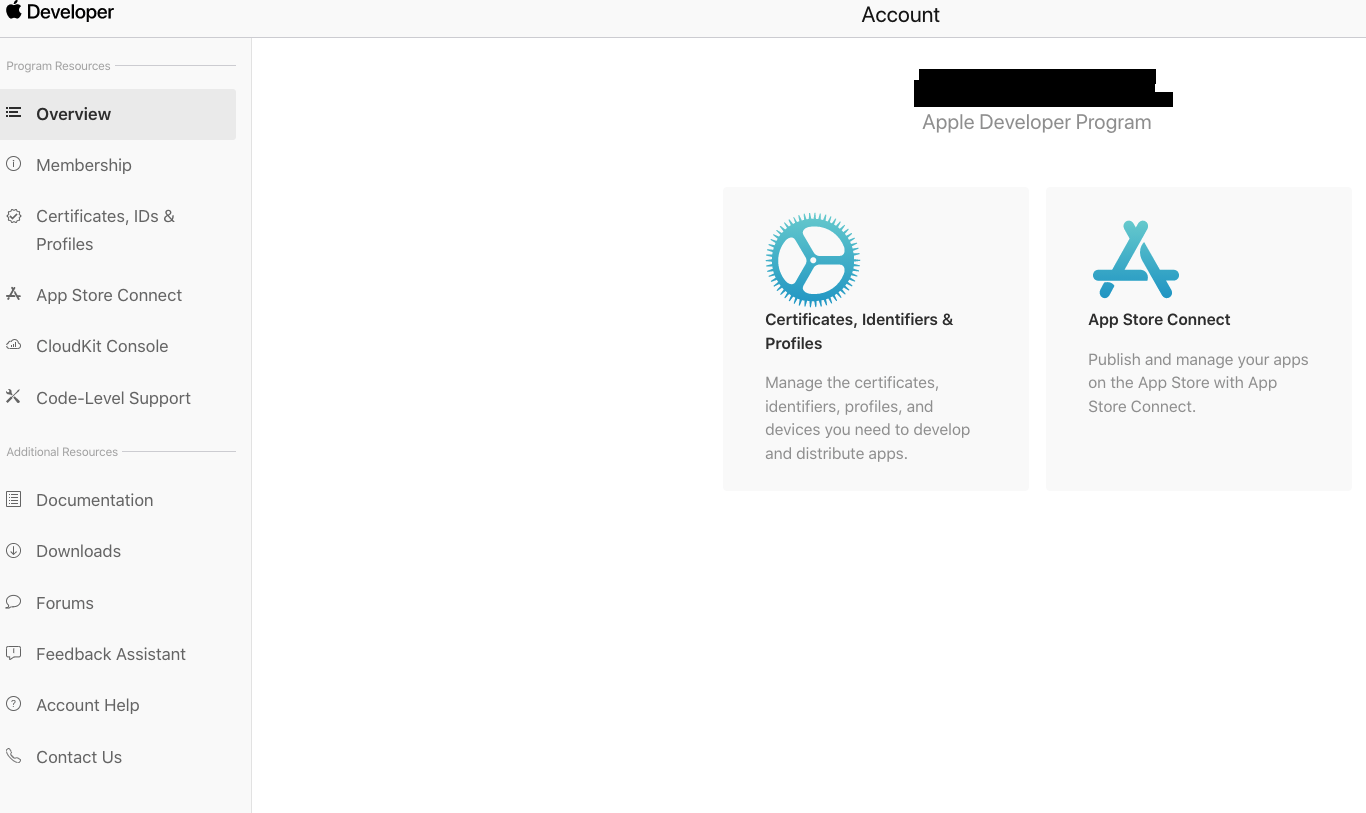
https://developer.apple.com/kr/
위 링크로 접속해서 계정(account)를 클릭
개발자 멤버십을 구매하자 (년 단위 갱신이 필요하다)
결제가 완료되면 아래와 같은
화면을 만날수 있다.
본격적인 시작에 앞서
키체인을 통해 CSR이라 불리는 파일을 하나 만들것이다.
mac에서 키체인 접근을 열어보자
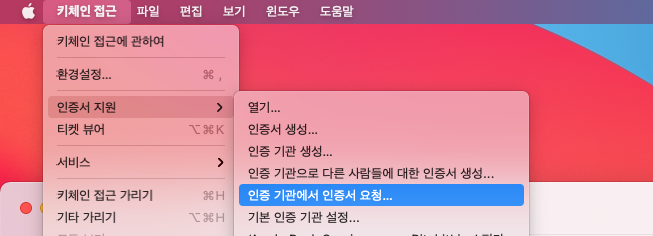
키체인 접근 >>> 인증 기관에서 인증서 요청
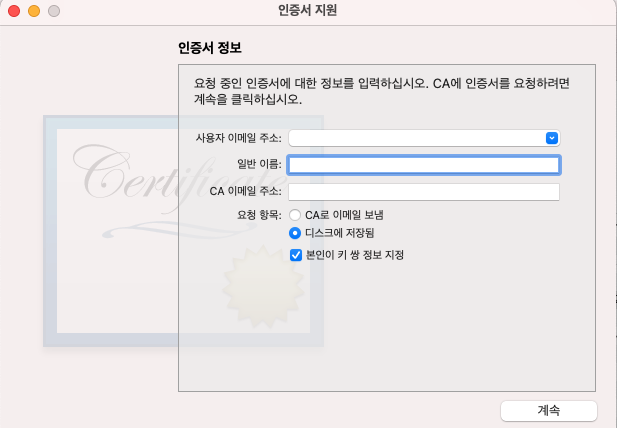
위와 같이 옵션 체크해서
저장하면

이런 파일을 얻을수 있다.
해당 파일은 앞으로 작업에 계속 쓰일예정이다.
Apple developer 사이트를 열어보자
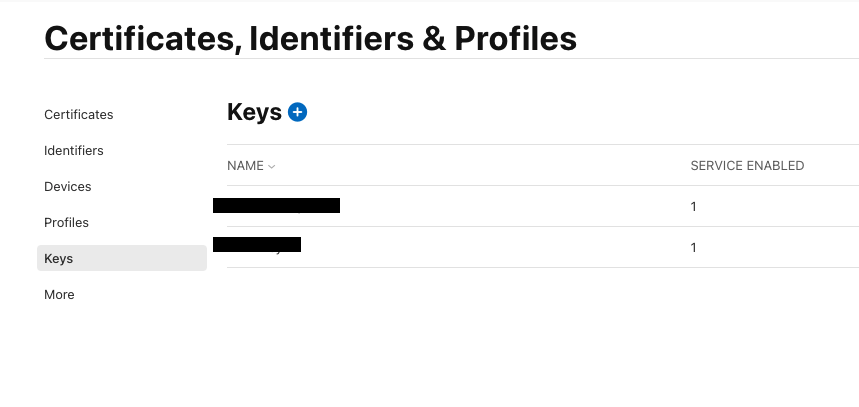
여기서 Apns key파일을 만들건데 여기서 만드는 키 파일은
최대 2개까지만 생성 가능하다.
관리에 주의하자
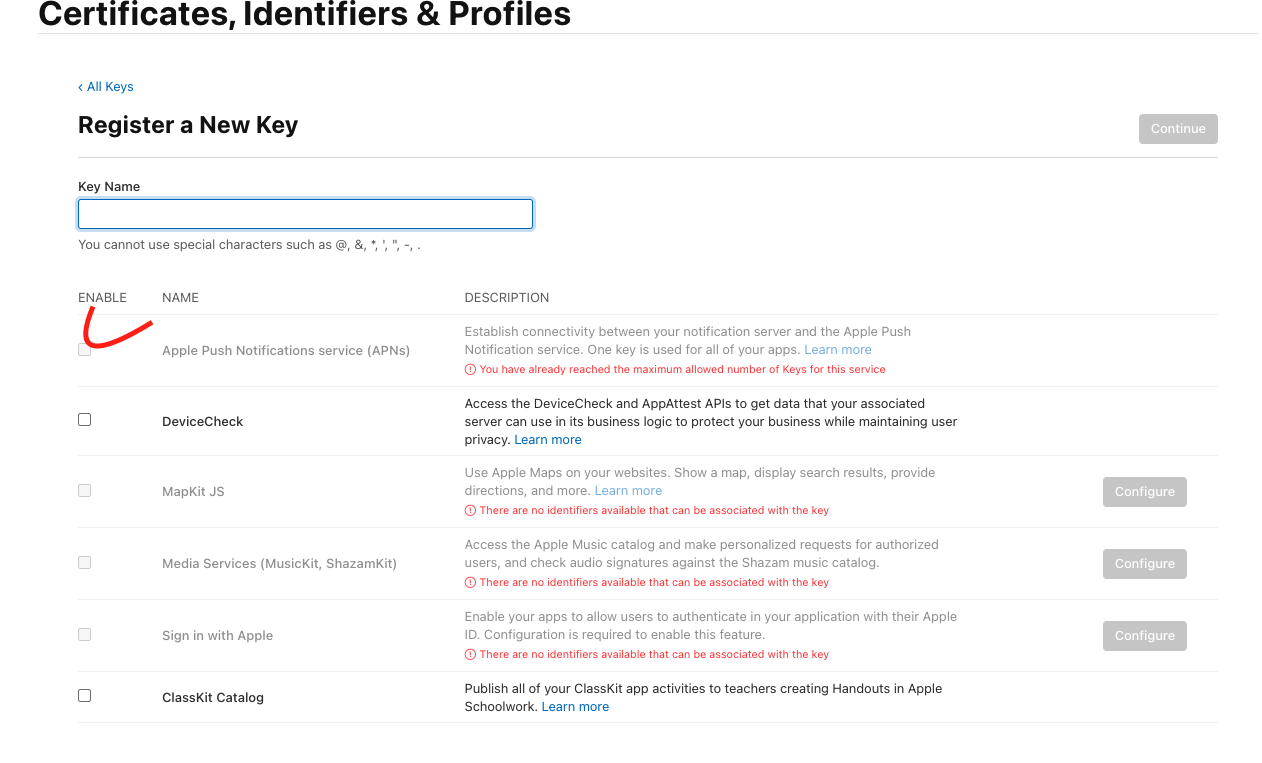
첫번째 항목을 선택해서
확실하게 알아볼수 있는 KeyName을 붙여준뒤
생성!
다음은
다시 apple developer 사이트로 돌아가
Certificates, IDs 탭으로 이동
바로 인증서를 만들어볼것이다

추가 버튼을 눌러보자
2가지 인증서를 만들어야한다.
한개는 개발용, 나머지 하나는 배포용이다.
우리는 10개정도의 인증서를 만들어낼 계획이니
인증서의 네이밍을 확실하게 하자.
여기서는
IOS Developer
Apple Distribution
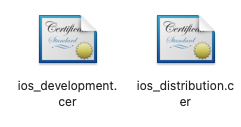
두개의 파일을 추가로 얻었다
계속해서 진행해보자
다운받은 두개의 파일을
각각 더블클릭해서
키체인에 추가한다.
xcode에서 팀 인증을 할때 release, debug에 맞게 쓰면 된다.
AppID를 추가할 차례이다
다시 Apple developer 사이트로 돌아가보자
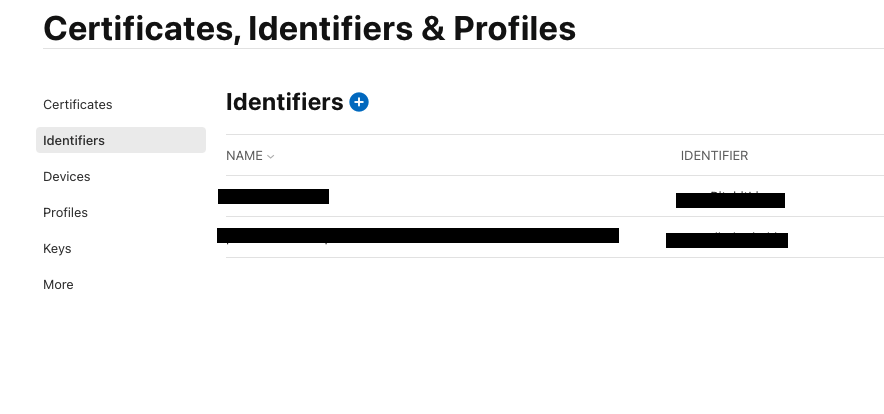
화면의 + 버튼을 눌러보자 >>> App Ids 상태로 Continue >>> App 상태로 Continue
** 앱 상세기능 목록에서 Push Notification을 추가할것이다.
중요한 포인트는 Push Notification 라인에
잘 보면 Configure 0개라고 써있을것이다
이것을 클릭해서 2개를 추가해줄건데
이때, 처음에 만들었던 CSR 파일을 이용하면 된다.
추가했다면 다음으로 넘어가
xcode를 참고해 Bundle ID를 입력,
Description은 어떤 앱을 위한 ID인지 분별할수 있게 작성

AppID 설정도 완료되었다
이제 60%쯤왔다.
정말 길고 힘들지만
피할수없다. 앱에 푸시를 안쓸거면
굳이 앱이 필요한가? 싶을정도로
푸시는 중요하기 때문이다.
테스트 Device를 등록하면
TestFlight이나 Firebase Distribution을 이용해
온디바이스 테스트를 진행해볼수도 있다.
근데 이 또한 지나칠수 없다.
Simulator에서는 푸시알림 테스트가
애플 정책상 불가하기 때문이다.
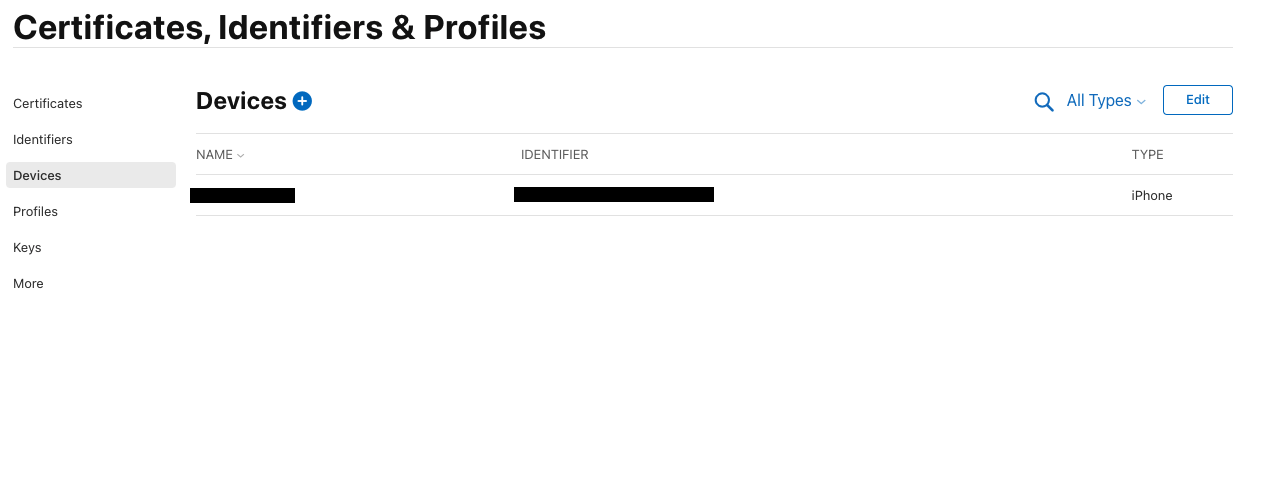
Apple Developer에서 테스트 디바이스를 추가할 수 있다.
맥에 아이폰을 연결하면
xcode에서 내 아이폰(혹은 다른 ios 디바이스)의
고유 아이디를 확인할수있다.

(xcode > Window > Devices and Simulators)
Apple Developer에서 해야할 마지막 작업이다.
바로 Privisioning Profiles...
어렵지 않다.
이전에 했던 작업들과 유사하다.

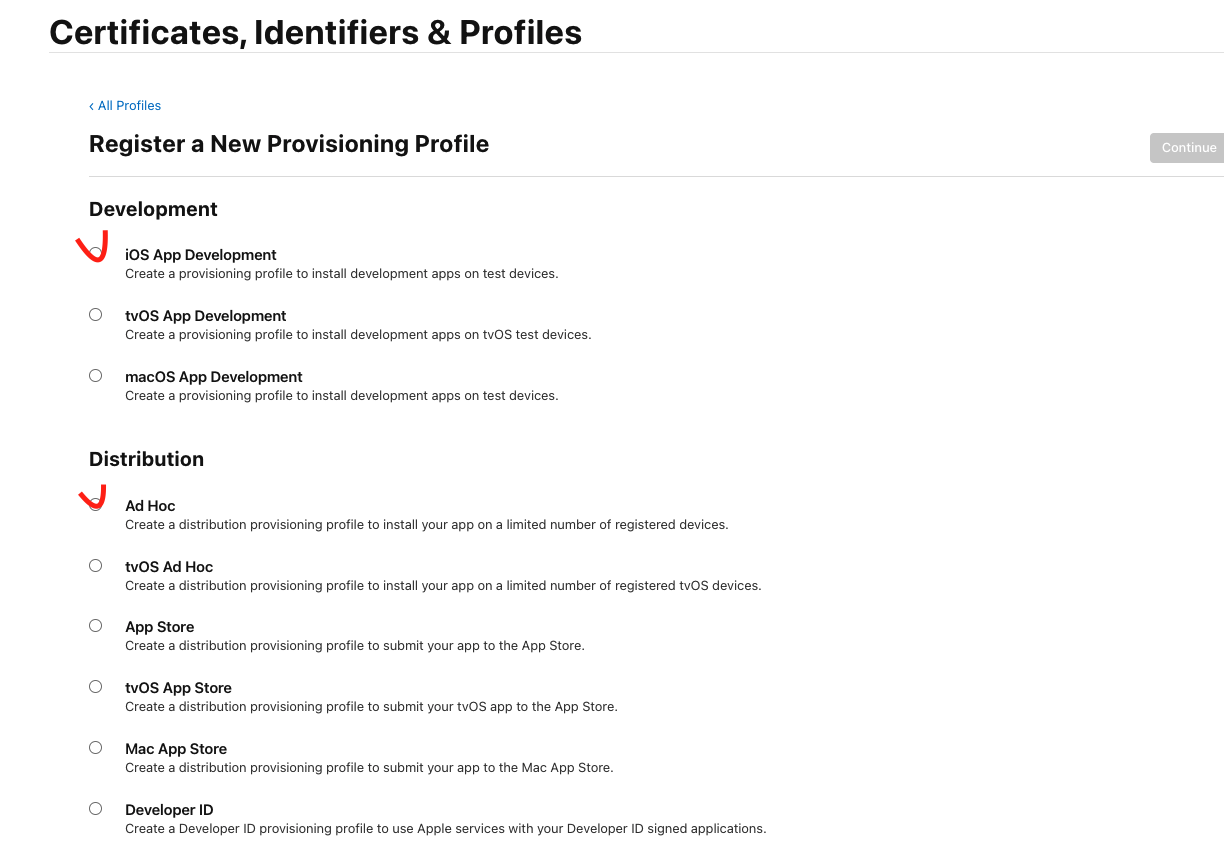
이미지의 선택된
두가지 항목에 대해서 작업을 진행할것이다.
위 작업은 계속해서 Continue하며 안내에 따라 진행하면된다.
이때 다운로드하는 파일의 이름을 dev, dist에 알맞게 지어주자
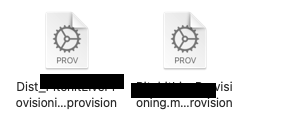
이렇게 앞에 수식어를 붙여줌으로써 구분해두면 좋다
이제 요 파일들을 가지고 xcode에서
signing 작업을 진행해줄것이다.
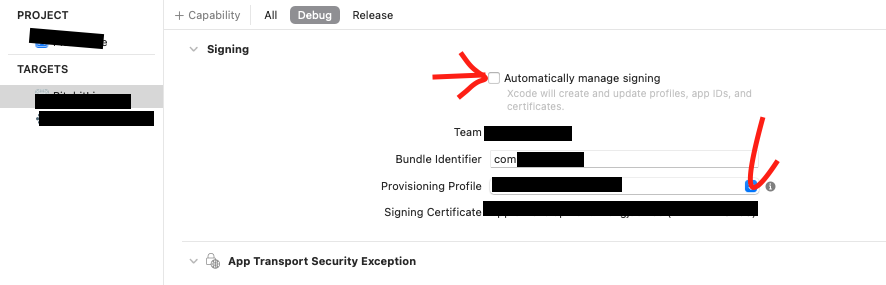
debug, release 탭에서 동일하게 위와같이 작업해주면된다
Auto는 꺼주고 다운로드 받은 Provisioning Profile로
인증을 진행해주는것이다.
마지막으로
xcode에서 뺴먹지말고 해줄 셋팅이있다.
https://rnfirebase.io/messaging/usage/ios-setup
위 가이드라인에도 잘 나와있듯이
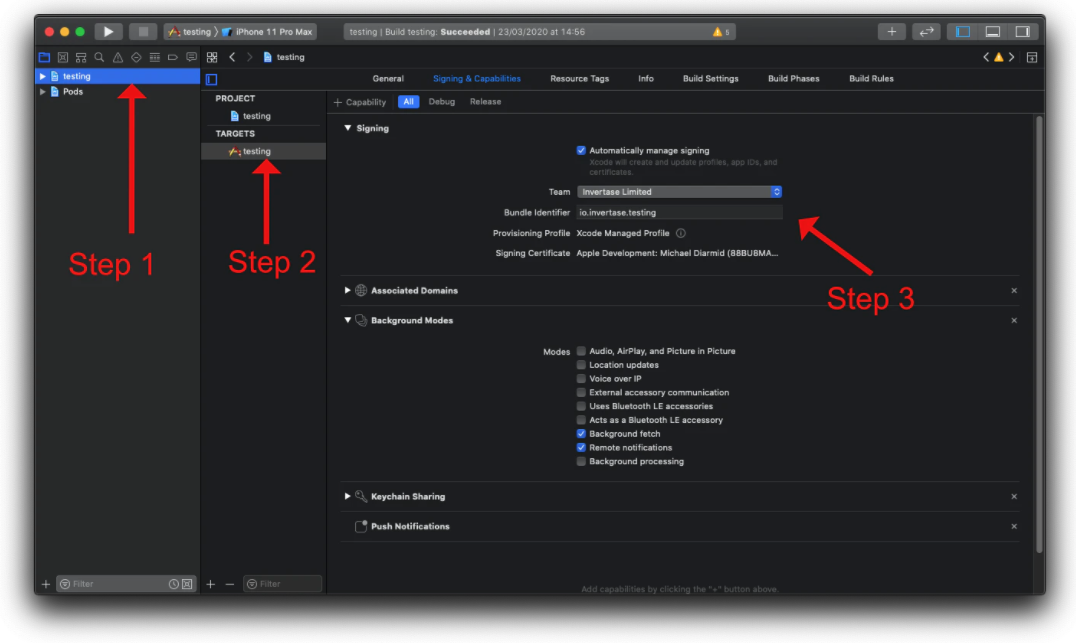
이렇게 Background Modes에 두가지 속성을 켜주고
PushNotification을 셋업해줘야한다.
자, 이제 지긋지긋한 셋업도
진짜 끝나간다.
아래 모듈을 설치하자
yarn add @react-native-firebase/app
yarn add @react-native-firebase/messaging

cd ios/ && pod install
(npm으로 하지말고 yarn으로 설치할것을 권장
안그러면 설치 오류를 만날수있음)
프로젝트에 firebase.json추가
// firebase.json

{
  "react-native": {
    "analytics_auto_collection_enabled": false,
    "messaging_auto_init_enabled": false,
    "messaging_android_headless_task_timeout": 30000,
    "messaging_android_notification_color": "@color/dark"
  }
}
드디어 코드를 만들어볼 차례이다.
utils/push.fcm.js
utils/push.noti.js
utils 폴더를 하나 만들고 그 아래 두개의 파일을 만들어보자
(babel.config.js와 tsconfig.json 세팅도 이전 게시물을 참고해서 설정해보기)
// push.noti.js

import PushNotification from 'react-native-push-notification';
import PushNotificationIOS from '@react-native-community/push-notification-ios';
import {Platform} from 'react-native';

class LocalNotificationService {
  configure = onOpenNotification => {
    PushNotification.configure({
      onRegister: function (token) {
        console.log('[LocalNotificationService] onRegister : localtoken', token);
      },
      onNotification: function (notification) {
        console.log('[LocalNotificationService] onNotification ', notification);
        if (!notification?.data) {
          return;
        }
        notification.userInteraction = true;
        onOpenNotification(Platform.OS === 'ios' ? notification.data.item : notification.data);

        if (Platform.OS === 'ios') {
          notification.finish(PushNotificationIOS.FetchResult.NoData);
        }
      },
      permissions: {
        alert: true,
        badge: true,
        sound: true,
      },
      popInitialNotification: true,
      requestPermissions: true,
    });
  };

  unRegister = () => {
    PushNotification.unregister();
  };

  showNotification = (id, title, message, data = {}, options = {}) => {
    PushNotification.localNotification({
      // Android only Properties
      ...this.buildAndroidNotification(id, title, message, data, options),
      // IOS and Android properties
      ...this.buildIOSNotification(id, title, message, data, options),
      // IOS and Android properties
      title: title || '',
      message: message || '',
      playSound: options.playSound || false,
      soundName: options.soundName || 'default',
      userInteraction: false,
    });
  };

  buildAndroidNotification = (id, title, message, data = {}, options = {}) => {
    return {
      id: id,
      authCancel: true,
      largeIcon: options.largeIcon || 'ic_launcher',
      smallIcon: options.smallIcon || 'ic_notification',
      bigText: message || '',
      subText: title || '',
      vibrate: options.vibrate || true,
      vibration: options.vibration || 300,
      priority: options.priority || 'high',
      importance: options.importance || 'high',
      data: data,
    };
  };

  buildIOSNotification = (id, title, message, data = {}, options = {}) => {
    return {
      alertAction: options.alertAction || 'view',
      category: options.category || '',
      userInfo: {
        id: id,
        item: data,
      },
    };
  };

  cancelAllLocalNotifications = () => {
    if (Platform.OS === 'ios') {
      PushNotificationIOS.removeAllDeliveredNotifications();
    } else {
      PushNotification.cancelAllLocalNotifications();
    }
  };

  removeDeliveredNotificationByID = notification => {
    console.log('[LocalNotificationService] removeDeliveredNotificationByID:', notification);
    PushNotification.cancelLocalNotifications({id: `${notificationId}`});
  };
}

export const localNotificationService = new LocalNotificationService();
// push.fcm.js

import messaging from '@react-native-firebase/messaging';
import {Alert, Platform} from 'react-native';

class FCMService {
  register = (onRegister, onNotification, onOpenNotification) => {
    this.checkPermission(onRegister);
    this.createNotificationListeners(onRegister, onNotification, onOpenNotification);
  };

  registerAppWithFCM = async () => {
    if (Platform.OS === 'ios') {
      await messaging().setAutoInitEnabled(true);
    }
  };

  checkPermission = onRegister => {
    messaging()
    .hasPermission()
    .then(enabled => {
      if (enabled) {
        this.getToken(onRegister);
      } else {
        this.requestPermission(onRegister);
      }
    })
    .catch(error => {
      console.log('[FCMService] Permission rejected ', error);
    });
  };

  getToken = onRegister => {
    messaging()
    .getToken()
    .then(fcmToken => {
      if (fcmToken) {
        onRegister(fcmToken);
      } else {
        console.log('[FCMService] User does not have a device token');
      }
    })
    .catch(error => {
      console.log('[FCMService] getToken rejected', error);
    });
  };

  requestPermission = onRegister => {
    messaging()
    .requestPermission()
    .then(() => {
      this.getToken(onRegister);
    })
    .catch(error => {
      console.log('[FCMService] Request Permission rejected', error);
    });
  };

  deleteToken = () => {
    messaging()
    .deleteToken()
    .catch(error => {
      console.log('[FCMService] Delete token error', error);
    });
  };

  createNotificationListeners = (onRegister, onNotification, onOpenNotification) => {
    messaging().onNotificationOpenedApp(remoteMessage => {
      if (remoteMessage) {
        const notification = remoteMessage.notification;
        onOpenNotification(notification);
      }

      Alert.alert(remoteMessage.body);
    });

    messaging()
    .getInitialNotification()
    .then(remoteMessage => {
      if (remoteMessage) {
        const notification = remoteMessage.notification;
        onOpenNotification(notification);
      }
    })
    .catch(error => {
      console.log('quit state notification error : ', error);
    });

    this.messageListener = messaging().onMessage(async remoteMessage => {
      if (remoteMessage) {
        let notification = null;
        if (Platform.OS === 'ios') {
          notification = remoteMessage.data.notification;
        } else {
          notification = remoteMessage.notification;
        }
        onNotification(notification);
      }
    });

    messaging().onTokenRefresh(fcmToken => {
      onRegister(fcmToken);
    });
  };

  unRegister = () => {
    this.messageListener();
  };
}

export const fcmService = new FCMService();
// app.js - 단순 참고용이니 참고만하자

import {fcmService} from '@utils/push.fcm';
import {localNotificationService} from '@utils/push.noti';

const App = () => {
  const [token, setToken] = useState('');

  useEffect(() => {
    fcmService.registerAppWithFCM();
    fcmService.register(onRegister, onNotification, onOpenNotification);
    localNotificationService.configure(onOpenNotification);
  }, []);

  const onRegister = (tk: string) => {
    console.log('[App] onRegister : token :', tk);
    if (tk) setToken(tk);
  }

  const onNotification = (notify: any) => {
    console.log('[App] onNotification : notify :', notify);
    const options = {
      soundName: 'default',
      playSound: true,
    };

    localNotificationService.showNotification(
      0,
      notify.title,
      notify.body,
      notify,
      options,
    );
  }

  const onOpenNotification = (notify: any) => {
    console.log('[App] onOpenNotification : notify :', notify);
    Alert.alert('Open Notification : notify.body :' + notify.body);
  }

  const onCopy = () => {
    Clipboard.setString(token);
  }

  ...

  return (
    ...
      <TouchableOpacity onPress={onCopy}>
        <Section title="My token">{token || 'unknown token'}</Section>
      </TouchableOpacity>
    ...
  )
}
// index.js - 마찬가지다 참고만하자
import messaging from '@react-native-firebase/messaging';
messaging().setBackgroundMessageHandler(async remoteMessage => {
console.log('Background remote message: ', remoteMessage);
});
function HeadlessCheck({isHeadless}) {
if (isHeadless) {
return null;
}
return <App />;
}
AppRegistry.registerComponent(appName, () => HeadlessCheck);
길고 긴 세팅이 모두 끝났다.
알림을 발송해보자
안드로이드와 아이폰에서 각각 앱을 빌드해두고
(npm run android, npm run ios)
firebase 페이지에 접속한다
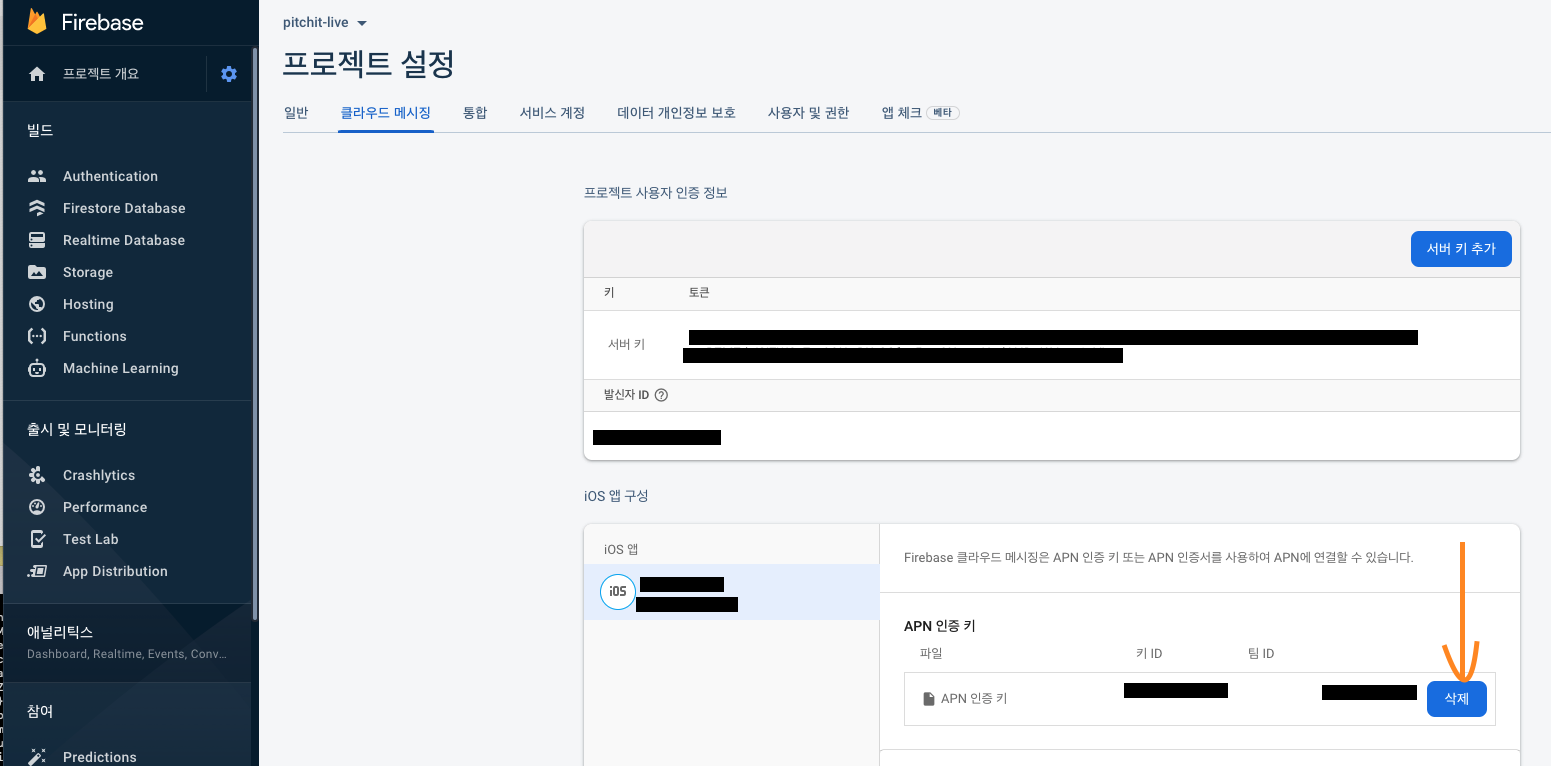
인증키를 아직 등록하지 않았다면
화살표부분에 인증키를 입력하는 버튼이 있을것이다.
아까 처음에 만들었던 Apns키를 여기서 등록해주면 된다.
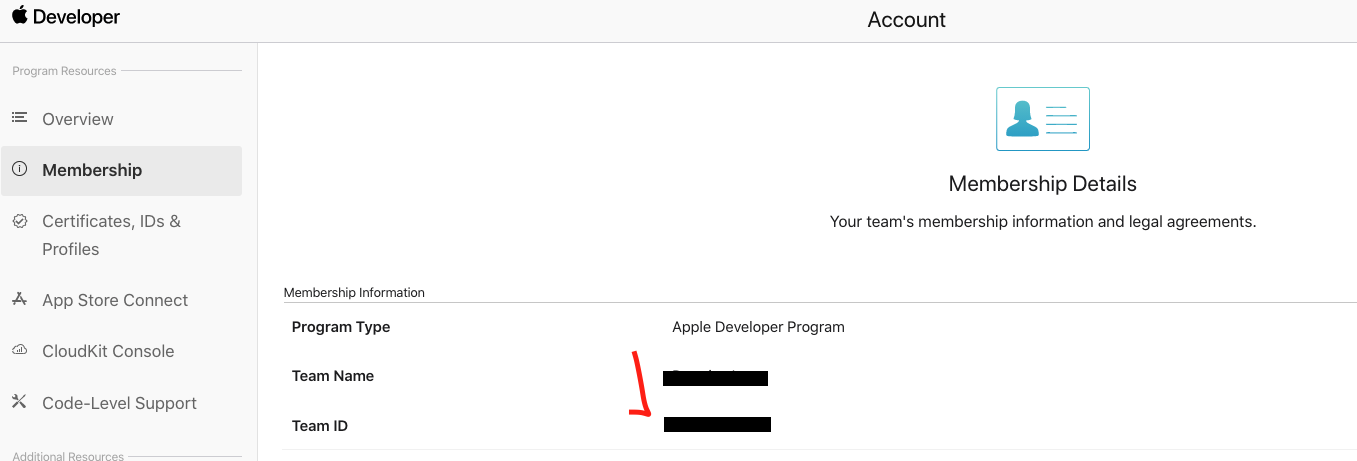
Team ID는
Apple Developer -> Account에서 확인할 수 있다.
자 발송을 해보자!
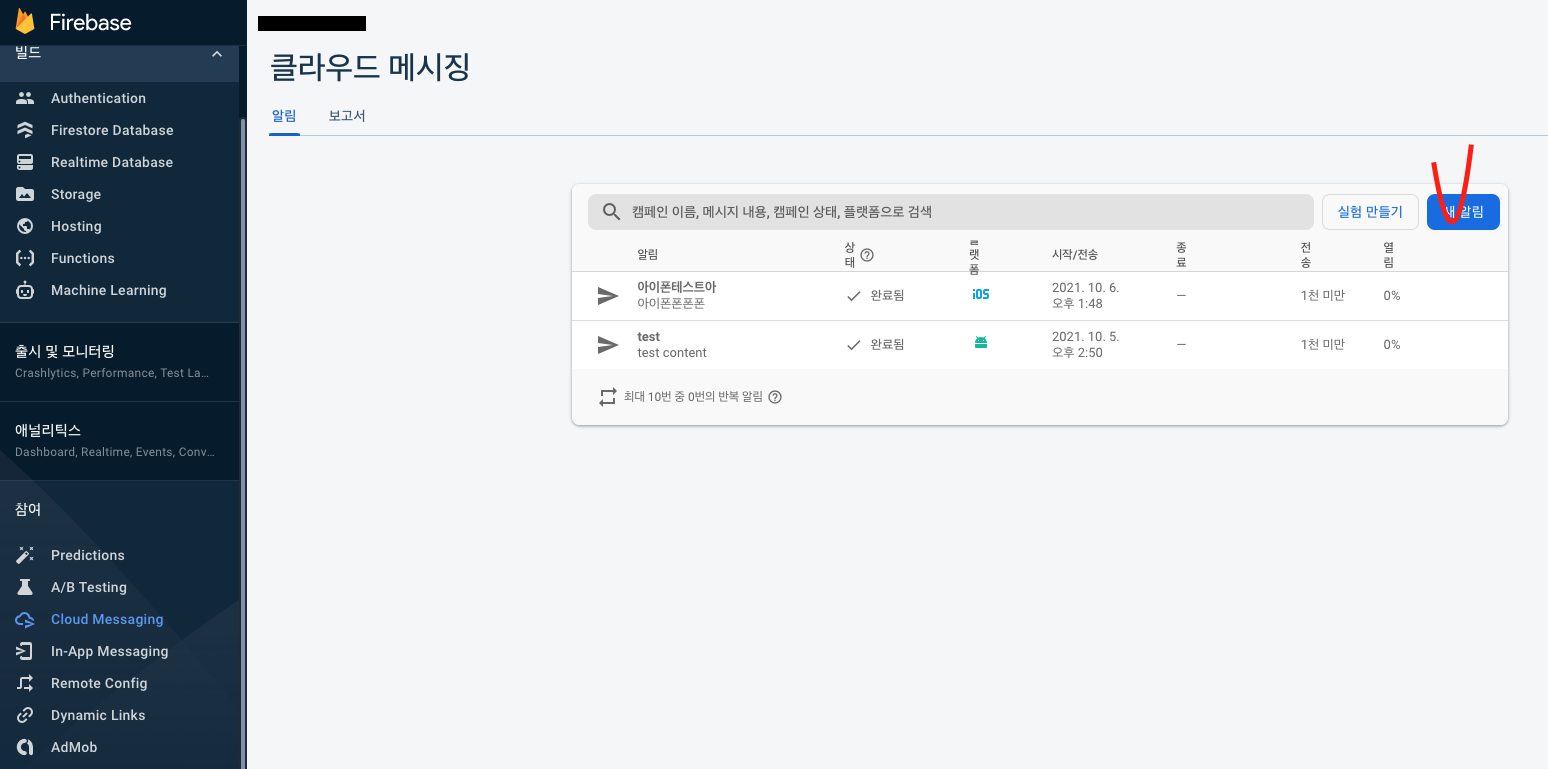

위 버튼을 이용해서 알림을 발송해 볼수있는데
이때 토큰을 입력하라고한다.
토큰의 디바이스별로 발급되는 고유 토큰인데
위에서 작성한 코드를 통해 우리는
UI로 확인하고 터치하여 코드를 복사할 수 있다.
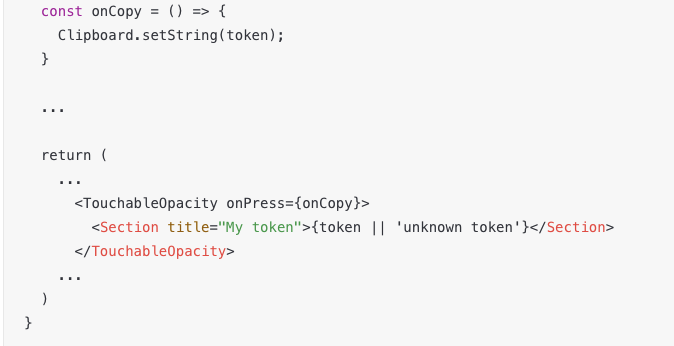
화면에서 코드를 복사해다가
발송을 시도해보자
잘 되길 바란다.
미래의 나에게...
'개발, 코딩 > App - React Native' 카테고리의 다른 글
| ReactNative, 앱 진입화면 설정 (splash screen) (0) | 2021.10.08 |
|---|---|
| React-Native 가이드 - (5) 배포하기 (0) | 2021.10.07 |
| React-Native 가이드 - (2) 개발환경 세팅하기 (0) | 2021.10.05 |
| React-Native 가이드 - (1) 프로젝트 생성하기 (0) | 2021.10.05 |
| React Native 가이드 - 시작 (0) | 2021.10.05 |